This integration is powered by Singer's Mixpanel tap and certified by Stitch. Check out and contribute to the repo on GitHub.
For support, contact Support.
Mixpanel integration summary
Stitch’s Mixpanel integration replicates data using the Mixpanel Event Export API and Mixpanel Query API. Refer to the Schema section for a list of objects available for replication.
Mixpanel feature snapshot
A high-level look at Stitch's Mixpanel (v1) integration, including release status, useful links, and the features supported in Stitch.
| STITCH | |||
| Release status |
Released on June 2, 2020 |
Supported by | |
| Stitch plan |
Standard |
API availability |
Available |
| Singer GitHub repository | |||
| REPLICATION SETTINGS | |||
| Anchor Scheduling |
Supported |
Advanced Scheduling |
Supported |
| Table-level reset |
Unsupported |
Configurable Replication Methods |
Unsupported |
| DATA SELECTION | |||
| Table selection |
Supported |
Column selection |
Supported |
| Select all |
Supported |
||
| TRANSPARENCY | |||
| Extraction Logs |
Supported |
Loading Reports |
Supported |
Connecting Mixpanel
Mixpanel setup requirements
To set up Mixpanel in Stitch, you need:
-
Admin privileges. These are required to retrieve your API secret in your Mixpanel account.
Step 1: Retrieve your Mixpanel project timezone and API secret
- Login to your Mixpanel account.
- In the dropdown menu in the upper left corner of the page, select the project you want to replicate data from.
- Hover over the Settings icon in the upper right corner. In the PROJECT SETTINGS portion of the dropdown menu, click on the link with the name of your project.
- Copy the Project Timezone and API Secret, and paste those values someplace safe to use for the next step.
Step 2: Add Mixpanel as a Stitch data source
- Sign into your Stitch account.
-
On the Stitch Dashboard page, click the Add Integration button.
-
Click the Mixpanel icon.
-
Enter a name for the integration. This is the name that will display on the Stitch Dashboard for the integration; it’ll also be used to create the schema in your destination.
For example, the name “Stitch Mixpanel” would create a schema called
stitch_mixpanelin the destination. Note: Schema names cannot be changed after you save the integration. - In the API Secret field, paste the API Secret you retrieved from Step 1.
- In the Attribution Window field, enter the number of days you want your tables’ attribution window to be. For more information on attribution windows, refer to the Replication section.
-
In the Date Window Size field, enter the number of days desired for a date looping window for the
exports,funnels, andrevenuestables.Date looping will return records whose
from_dateandto_datefall between the number of days in the defined window size.Note: If your project has large volumes of events, you may want to set the number of days to
14,7, or even to1or2days. - Optional: To fetch specific events, enter a comma-separated list of events in the Export Events field. For example:
Page Viewed, Signed Up. - In the Project Timezone field, paste the Project Timezone you retrieved from Step 1.
- Optional: To capture new properties automatically in the
eventsandengagetables, check the Select Properties By Default box. Otherwise, new properties will be ignored.
Step 3:
The Sync Historical Data setting defines the starting date for your Mixpanel integration. This means that data equal to or newer than this date will be replicated to your data warehouse.
For a detailed look at historical replication jobs, check out the Syncing Historical SaaS Data guide.
Note: Mixpanel limits the number of days historical data may be accessed, depending on your Mixpanel plan. If you select a Start Date greater than what your Mixpanel account has access to, Stitch may encounter issues with Mixpanel’s API.
For example: If you have a Starter Free Mixpanel plan, you have access to 90 days of historical data (as of 06/5/2020). If you select a Start Date greater than 90 days, Mixpanel’s API may return an error.
Additionally, the Start Date must be less than or equal to 365 days. If a Start Date greater than 365 days is selected, Stitch will reset the Start Date to 365 days during Extraction.
Refer to Mixpanel’s documentation for more info and to check your Mixpanel account’s historical data access limit.
Step 4: Create a replication schedule
In the Replication Frequency section, you’ll create the integration’s replication schedule. An integration’s replication schedule determines how often Stitch runs a replication job, and the time that job begins.
Mixpanel integrations support the following replication scheduling methods:
-
Advanced Scheduling using Cron (Advanced or Premium plans only)
To keep your row usage low, consider setting the integration to replicate less frequently. See the Understanding and Reducing Your Row Usage guide for tips on reducing your usage.
Step 5: Set objects to replicate
The last step is to select the tables and columns you want to replicate. Learn about the available tables for this integration.
Note: If a replication job is currently in progress, new selections won’t be used until the next job starts.
For Mixpanel integrations, you can select:
-
Individual tables and columns
-
All tables and columns
Click the tabs to view instructions for each selection method.
- In the integration’s Tables to Replicate tab, locate a table you want to replicate.
-
To track a table, click the checkbox next to the table’s name. A blue checkmark means the table is set to replicate.
-
To track a column, click the checkbox next to the column’s name. A blue checkmark means the column is set to replicate.
- Repeat this process for all the tables and columns you want to replicate.
- When finished, click the Finalize Your Selections button at the bottom of the screen to save your selections.
- Click into the integration from the Stitch Dashboard page.
-
Click the Tables to Replicate tab.
- In the list of tables, click the box next to the Table Names column.
-
In the menu that displays, click Track all Tables and Fields:
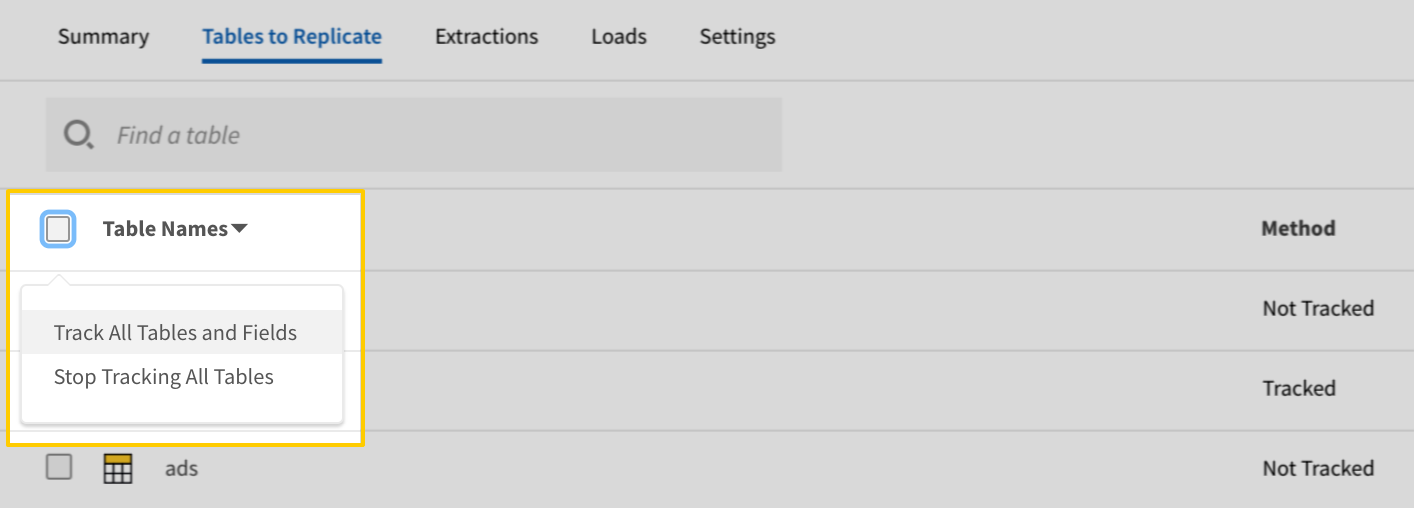
- Click the Finalize Your Selections button at the bottom of the page to save your data selections.
Initial and historical replication jobs
After you finish setting up Mixpanel, its Sync Status may show as Pending on either the Stitch Dashboard or in the Integration Details page.
For a new integration, a Pending status indicates that Stitch is in the process of scheduling the initial replication job for the integration. This may take some time to complete.
Initial replication jobs with Anchor Scheduling
If using Anchor Scheduling, an initial replication job may not kick off immediately. This depends on the selected Replication Frequency and Anchor Time. Refer to the Anchor Scheduling documentation for more information.
Free historical data loads
The first seven days of replication, beginning when data is first replicated, are free. Rows replicated from the new integration during this time won’t count towards your quota. Stitch offers this as a way of testing new integrations, measuring usage, and ensuring historical data volumes don’t quickly consume your quota.
Mixpanel replication
Attribution windows and data extraction
When Stitch runs a replication job for Mixpanel, it will use the value of the Attribution Window setting to query for and extract data for tables using Key-based Incremental Replication. An attribution window is a period of time for attributing results to ads and the lookback period after those actions occur during which ad results are counted.
For example: If set to 5 days, Stitch will replicate the past five days’ worth of data for applicable tables every time a replication job runs. While Stitch replicates data in this way to account for updates to records made during the attribution window, it can have a substantial impact on your overall row usage.
Note: If the beginning of the attribution window is earlier than the selected Start Date, the replication will start from the Start Date and no data before that date will be fetched. For example, if you set the Start Date to five days ago and the attribution window to ten days, only the past five days’ worth of data will be replicated.
In the sections below are examples of how attribution windows impact how Stitch extracts data during historical and ongoing replication jobs.
For historical and full re-replications of Mixpanel data, Stitch will query for and extract data newer than or equal to the date defined in the Start Date field in the Integration Settings page.
Example
During the initial set up, the Start Date field is defined as 07/03/2017, or 2017-07-03 00:00:00.
If you were to write a SQL query using this date for the revenue table, it might look like this:
  SELECT *
    FROM mixpanel.revenue
   WHERE date >= '2017-07-03 00:00:00'   /* Start Date */
ORDER BY date
For ongoing replication jobs, Stitch will query for and extract data using the last saved maximum value in the table’s Replication Key column and the Attribution Window for the table.
Note: This applies to every replication job that takes place after the historical replication job.
Example
The last maximum saved Replication Key value for the revenue table is 2017-10-01 00:00:00.
To account for the Attribution Window of 5 days, we’d subtract this from the last maximum saved Replication Key value:
2017-10-01 00:00:00 - 5 days = 2017-09-26 00:00:00
In this case, Stitch would query for and extract data that is newer than or equal to 2017-09-26 00:00:00 and older than or equal to 2017-10-01 00:00:00.
If this were a SQL query, it might look like this:
  SELECT *
    FROM revenue
   WHERE date >= '2017-09-26 00:00:00'
                              /* max Replication Key value - Attribution Window */
     AND date <= '2017-10-01 00:00:00'
                              /* max Replication Key value from previous job */
ORDER BY date
Attribution windows and row count impact
Due to the Attribution Window, a high Replication Frequency may not be necessary. Because Stitch will replicate data from the past N days during every replication job, recent data will be re-replicated and count towards your row quota.
To reduce your row usage and replicating redundant data, consider setting the integration to replicate less frequently. For example: every 12 or 24 hours.
Hidden fields in Mixpanel
The Stitch Mixpanel integration is not able to discover fields marked as hidden in your Mixpanel account. To ensure the fields you want replicated will be available in Stitch, double-check that they aren’t hidden in your Mixpanel account.
Mixpanel table reference
Mixpanel free plan
The engage and export tables are not available if you are using the free Mixpanel plan.
Schemas and versioning
Schemas and naming conventions can change from version to version, so we recommend verifying your integration’s version before continuing.
The schema and info displayed below is for version 1 of this integration.
This is the latest version of the Mixpanel integration.
Table and column names in your destination
Depending on your destination, table and column names may not appear as they are outlined below.
For example: Object names are lowercased in Redshift (CusTomERs > customers), while case is maintained in PostgreSQL destinations (CusTomERs > CusTomERs). Refer to the Loading Guide for your destination for more info.
annotations
The annotations table contains info about annotations.
|
Full Table |
|
|
Primary Key |
date |
| Useful links |
| Join annotations with | on |
|---|---|
| cohorts |
annotations.project_id = cohorts.project_id |
|
date
DATE-TIME |
|
description STRING |
|
id INTEGER |
|
project_id INTEGER |
cohort_members
The cohort_members table contains info about the cohorts user profiles belong to.
|
Full Table |
|
|
Primary Keys |
cohort_id distinct_id |
| Useful links |
| Join cohort_members with | on |
|---|---|
| cohorts |
cohort_members.cohort_id = cohorts.id |
|
cohort_id
INTEGER |
|
distinct_id
STRING |
cohorts
The cohorts table contains info about the cohorts in a Mixpanel project.
|
Full Table |
|
|
Primary Key |
id |
| Useful links |
| Join cohorts with | on |
|---|---|
| cohort_members |
cohorts.id = cohort_members.cohort_id |
| annotations |
cohorts.project_id = annotations.project_id |
|
count INTEGER |
|
created DATE-TIME |
|
description STRING |
|
id
INTEGER |
|
is_visible INTEGER |
|
name STRING |
|
project_id INTEGER |
engage
The engage table contains info about user profiles.
The schema for this table is dynamic, meaning that the columns Stitch detects are dependent upon the properties provided upon upload in Mixpanel. For every property available in Mixpanel for engage records, Stitch will display a column in the integration’s Tables to Replicate tab.
|
Full Table |
|
|
Primary Key |
distinct_id |
| Useful links |
|
distinct_id
STRING |
export
The export table contains “raw data dumps” of tracked events. The API endpoint for EU region servers will return a 200 terminated early error code.
Table schema
The schema for this table is dynamic, meaning that the columns Stitch detects are dependent upon the properties provided upon upload in Mixpanel. For every property available in Mixpanel for export records, Stitch will display a column in the integration’s Tables to Replicate tab.
Replication with attribution window
This table is replicated using the Attribution Window value defined in the integration’s settings page. Refer to the Replication section for more info.
Distinct events and loading behavior
As Stitch doesn’t use a Primary Key for this table, data will be loaded using Append-Only loading. This means you may see duplicate records in your destination, which requires a querying strategy that selects the latest version of each record.
Stitch takes this approach because it’s possible to track events without a distinct_id. In Mixpanel, distinct_id is used to identify a unique user:
Mixpanel’s client-side tracking libraries automatically assign a distinct_id to a user when they first visit a website or an application that has Mixpanel installed. Distinct_id should not contain any special characters such as forward slashes, as it will break the URL. Distinct_ids can and often should be sent in server-side implementations as well.
In order for Stitch to replicate records’ distinct_id attributes, your server-side Mixpanel implementation must send them with tracked events. If the server-side implementation doesn’t do this, this attribute will be null.
Previous versions of Stitch’s Mixpanel integration used distinct_id as part of a composite Primary Key for this table. However, due to the possibility of this attribute being null, Stitch no longer uses a Primary Key for this table, as null values in Primary Key columns will prevent successful Extraction.
When working with exports data in your destination, you’ll need to use a querying strategy that accounts for the Append-Only loading used by this table. We recommend using the following columns to de-duplicate records, along with the approach outlined in the Querying Append-Only tables guide:
distinct_ideventtime
|
Key-based Incremental |
|
|
Append-Only |
|
|
Replication Key |
time |
| Useful links |
|
dataset STRING |
|
distinct_id STRING |
|
event STRING |
|
labels
ARRAY |
|
sampling_factor INTEGER |
|
time
DATE-TIME |
funnels
The funnels table contains data about your Mixpanel funnels, segmented by funnel and day.
Note: This table is replicated using the Attribution Window value defined in the integration’s settings page. Refer to the Replication section for more info.
|
Key-based Incremental |
|
|
Primary Keys |
funnel_id date |
|
Replication Key |
date |
| Useful links |
|
analysis OBJECT
|
|||||||||||||||
|
date
DATE |
|||||||||||||||
|
datetime DATE-TIME |
|||||||||||||||
|
funnel_id
INTEGER |
|||||||||||||||
|
name STRING |
|||||||||||||||
|
steps
ARRAY
|
revenue
The revenue table contains info about revenue, segmented by day. The API endpoint for EU region servers will return a 400 bad requests (Timeout Error) code.
Note: This table is replicated using the Attribution Window value defined in the integration’s settings page. Refer to the Replication section for more info.
|
Key-based Incremental |
|
|
Primary Key |
date |
|
Replication Key |
date |
| Useful links |
|
amount NUMBER |
|
count INTEGER |
|
date
DATE |
|
datetime DATE-TIME |
|
paid_count INTEGER |
| Related | Troubleshooting |
Questions? Feedback?
Did this article help? If you have questions or feedback, feel free to submit a pull request with your suggestions, open an issue on GitHub, or reach out to us.