This integration is powered by Singer's Google Analytics 4 tap and certified by Stitch. Check out and contribute to the repo on GitHub.
For support, contact Support.
Google Analytics 4 integration summary
Stitch’s Google Analytics 4 integration allows you to create custom reports by selecting the metrics and dimension you want to replicate. You can create multiple reports and configure each of them individually. Refer to the Schema section for more info and an example table schema.
This integration:
- Supports creating multiple custom reports
- Supports custom metrics and dimensions
- Currently supports Lifetime Values, but not Cohorts
- Doesn’t currently support Filters or Segments
Note: This integration is affected by the Core Tokens Per Project Per Property Per Hour quota, so it may take several hours for historical syncs to complete.
Google Analytics 4 feature snapshot
A high-level look at Stitch's Google Analytics 4 (v1) integration, including release status, useful links, and the features supported in Stitch.
| STITCH | |||
| Release status |
Released on October 20, 2022 |
Supported by | |
| Stitch plan |
Standard |
API availability |
Available |
| Singer GitHub repository | |||
| REPLICATION SETTINGS | |||
| Anchor Scheduling |
Supported |
Advanced Scheduling |
Supported |
| Table-level reset |
Supported |
Configurable Replication Methods |
Unsupported |
| DATA SELECTION | |||
| Table selection |
Supported |
Column selection |
Supported |
| Select all |
Unsupported |
||
| TRANSPARENCY | |||
| Extraction Logs |
Supported |
Loading Reports |
Supported |
Connecting Google Analytics 4
Google Analytics 4 setup requirements
To set up Google Analytics 4 in Stitch, you need:
-
At least Read & Analyze permissions in the account you want to connect to Stitch. See Google’s documentation for more info.
-
To have recent data in the account you want to connect to Stitch. Verify that there is data from the past 30 days in the account before continuing.
-
To pause all ad-blocking software. Because Google authentication uses pop ups, you may encounter issues if ad blockers aren’t disabled during the setup.
Step 1: Add Google Analytics 4 as a Stitch data source
- Sign into your Stitch account.
-
On the Stitch Dashboard page, click the Add Integration button.
-
Click the Google Analytics 4 icon.
-
Enter a name for the integration. This is the name that will display on the Stitch Dashboard for the integration; it’ll also be used to create the schema in your destination.
For example, the name “Stitch Google Analytics 4” would create a schema called
stitch_google_analytics_4in the destination. Note: Schema names cannot be changed after you save the integration.
Step 2: Configure your custom reports
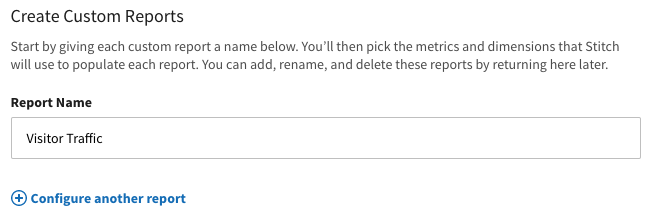
Next, you’ll configure the custom report(s) you want to replicate. The report(s) you enter on this page are used to create the tables in your destination.
In the Report Name field, enter the name of report. This will be used to dynamically create the name of the report’s corresponding table in the destination:

To add another report, click Configure another report and enter a name for the report.
Step 3: Define the conversion window
You can configure the number of days in this window using in the Conversion Window field. The value can be 30, 60 or 90 days. The conversion window is set to 90 days by default.
Step 4: Define the historical replication start date
The Sync Historical Data setting defines the starting date for your Google Analytics 4 integration. This means that data equal to or newer than this date will be replicated to your data warehouse.
Change this setting if you want to replicate data beyond Google Analytics 4’s default setting of 1 year. For a detailed look at historical replication jobs, check out the Syncing Historical SaaS Data guide.
Step 5: Create a replication schedule
In the Replication Frequency section, you’ll create the integration’s replication schedule. An integration’s replication schedule determines how often Stitch runs a replication job, and the time that job begins.
Google Analytics 4 integrations support the following replication scheduling methods:
-
Advanced Scheduling using Cron (Advanced or Premium plans only)
To keep your row usage low, consider setting the integration to replicate less frequently. See the Understanding and Reducing Your Row Usage guide for tips on reducing your usage.
Step 6: Authorize Stitch and select a Google Analytics profile

- Next, you’ll be prompted to log into your Google account and approve Stitch’s access to your Google Analytics 4 data. Note that we will only ever read your data.
- Click Allow to continue.
-
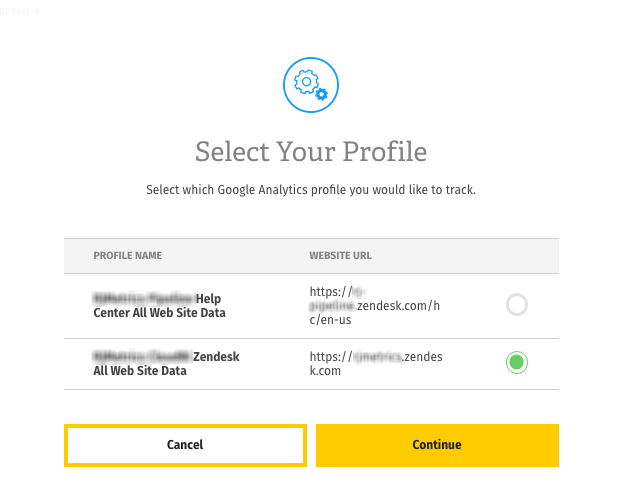
After your credentials are validated, you’ll be prompted to select the Google Analytics 4 profile you want to connect to Stitch.
Remember: Profiles need to have Read & Analyze permissions to be detected by Stitch. If you don’t see the profile you want in this list, we recommend that you double-check the permission settings.
- When finished, click Continue.
Step 7: Set metrics and dimensions to replicate
To complete the setup, you’ll need to select metrics and dimensions for each report you want to replicate to your destination.
- In the list of reports that displays - or in the Tables to Replicate tab, if you skipped this step during setup - locate a report you want to replicate.
- To track a report, click the checkbox next to the report’s name. You’ll be redirected to a page with a list of metrics and dimensions available for replication.
-
Select the metrics and dimensions you want to include in the report. When making your selections, keep the following in mind:
- You can select up to 10 metrics and 9 dimensions per report. This limit is imposed by Google and can’t be changed or worked around.
- Metric and dimension combinations are subject to Google’s compatibility rules. To test your combos before selecting them in Stitch, use Google’s Dimensions & Metrics Explorer.
-
Custom metrics and dimensions will display as either
ga:metricorga:dimension.How a custom dimension will look in your Google Analytics 4 console:

How the custom dimension above would be displayed in Stitch:

- Repeat this process for your remaining reports.
- When finished, click the Finalize Your Selections button at the bottom of the screen to save your selections.
Note: If these settings are changed while a replication job is still in progress, they will not be used until the next job starts.
Initial and historical replication jobs
After you finish setting up Google Analytics 4, its Sync Status may show as Pending on either the Stitch Dashboard or in the Integration Details page.
For a new integration, a Pending status indicates that Stitch is in the process of scheduling the initial replication job for the integration. This may take some time to complete.
Initial replication jobs with Anchor Scheduling
If using Anchor Scheduling, an initial replication job may not kick off immediately. This depends on the selected Replication Frequency and Anchor Time. Refer to the Anchor Scheduling documentation for more information.
Free historical data loads
The first seven days of replication, beginning when data is first replicated, are free. Rows replicated from the new integration during this time won’t count towards your quota. Stitch offers this as a way of testing new integrations, measuring usage, and ensuring historical data volumes don’t quickly consume your quota.
Google Analytics 4 replication
Custom report replication
Replication Method
Custom reports in Google Analytics 4 are replicated using Key-based Incremental Replication with start_date as a Replication Key. A start_date value is a date in YYYY-MM-DD format.
Renamed reports
When you rename a report after the integration has been created, Stitch will:
-
Load data into a new table in your destination. From the date the report is renamed, Stitch will load all data into a new table. The original table will remain in the destination unless you choose to drop it.
-
Continue replicating data from the Replication Key value saved for the table. You’ll need to reset the report to re-replicate all data from the integration’s Start Date and have it loaded into the new table.
To reset a report, click into the report and then click Report Settings on the right side of the page. Click the Reset Report button.
-
Retain your metric and dimension selections for the report. You won’t need to re-select metrics and dimensions.
Deleted reports
To delete a report, open the integration’s settings page, click Configure another report, and click Remove this report.
This will permanently remove the report from the integration, including any selected metrics and dimensions.
Note: Deleting a report in Stitch won’t automatically remove the corresponding table in your destination.
Metrics and dimensions
When selecting metrics and dimensions in Stitch, keep the following in mind:
Maximum selection limits
For each report in a Google Analytics 4 integration, you can select up to 10 metrics and 7 dimensions.
These limits are imposed by Google and can’t be changed or worked around. When you reach these limits, you won’t be able to make any other selections until you de-select a metric or dimension.
Compatibility rules
The metrics and dimensions you select in custom reports are subject to Google’s compatibility rules. Refer to Google’s Dimensions and Metrics Explorer for a list of valid dimension and metric pairs.
Google Analytics 4 table reference
Schemas and versioning
Schemas and naming conventions can change from version to version, so we recommend verifying your integration’s version before continuing.
The schema and info displayed below is for version 1 of this integration.
This is the latest version of the Google Analytics 4 integration.
Table and column names in your destination
Depending on your destination, table and column names may not appear as they are outlined below.
For example: Object names are lowercased in Redshift (CusTomERs > customers), while case is maintained in PostgreSQL destinations (CusTomERs > CusTomERs). Refer to the Loading Guide for your destination for more info.
sample_report
For every report you create in the integration’s settings page, Stitch will create a corresponding table in your destination. The table will contain the metrics and dimensions you select, along with a few columns Stitch requires for replication.
Note: Every row in this table pertains to a specific day. Use the start_date and end_date columns to identify what day the row is for.
The _sdc_record_hash column is a Stitch-generated SHA 256 hash that should be used as a Primary Key. The hash consists of a UTF-8 encoded JSON list containing:
- The account ID, web property ID, and profile ID of the associated report
- Pairs of
ga:dimension_nameanddimension_value - The
start_dateandend_datevalues for the record, inYYYY-mm-ddformat
|
Key-based Incremental |
|
|
Primary Key |
_sdc_record_hash |
|
Replication Key |
start_date |
|
account_id INTEGER |
|
end_date DATE-TIME |
|
profile_id STRING |
|
start_date
DATE-TIME |
|
web_property_id STRING |
|
_sdc_record_hash
STRING |
| Related | Troubleshooting |
Questions? Feedback?
Did this article help? If you have questions or feedback, feel free to submit a pull request with your suggestions, open an issue on GitHub, or reach out to us.