This integration is powered by Singer's Responsys tap and certified by Stitch. Check out and contribute to the repo on GitHub.
For support, contact Support.
Responsys feature snapshot
A high-level look at Stitch's Responsys (v1) integration, including release status, useful links, and the features supported in Stitch.
| STITCH | |||
| Release status |
Released on January 17, 2019 |
Supported by | |
| Stitch plan |
Standard |
Supported versions |
n/a |
| API availability |
Available |
Singer GitHub repository | |
| CONNECTION METHODS | |||
| SSH connections |
Supported |
SSL connections |
Unsupported |
| REPLICATION SETTINGS | |||
| Anchor Scheduling |
Supported |
Advanced Scheduling |
Supported |
| Table-level reset |
Unsupported |
Configurable Replication Methods |
Unsupported |
| REPLICATION METHODS | |||
| Log-based Replication |
Unsupported |
Key-based Replication |
Supported |
| Full Table Replication |
Unsupported |
||
| DATA SELECTION | |||
| Table selection |
Supported |
Column selection |
Unsupported |
| View replication |
Unsupported |
Select all |
Supported |
| TRANSPARENCY | |||
| Extraction Logs |
Supported |
Loading Reports |
Supported |
Connecting Responsys
Responsys setup requirements
To set up Responsys in Stitch, you need:
-
Export files that adhere to Stitch’s requirements. Files that aren’t set up correctly may not be replicated successfully, or may cause issues during extraction.
Step 1: Add Stitch's Public Key to your Responsys SFTP server
Stitch uses an SSH tunnel to securely connect to your Responsys SFTP server. This means that to connect successfully, you’ll need to add Stitch’s Public Key to your server.
Step 1.1: Retrieve your Stitch public key
- On the Stitch Dashboard page, click the Add Integration button.
- Click the Responsys icon.
-
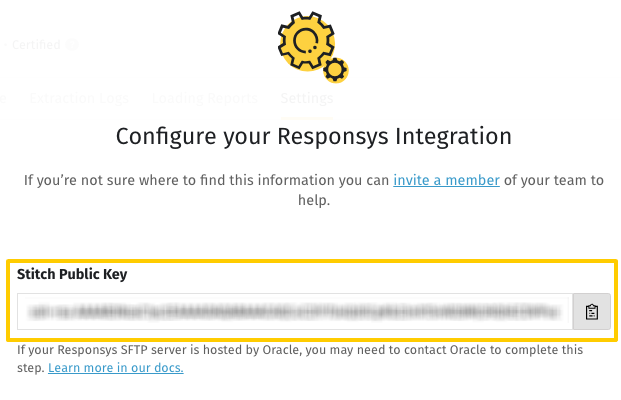
The Stitch public key will be at the top of the page that opens:
Step 1.2: Determine your SFTP server hosting
Next, you’ll need to add the public key to your SFTP server. The steps for doing this depend on how your SFTP server is hosted:
Contact Oracle and provide them with the public key to complete this step.
If your SFTP server is self-hosted, or not hosted by Oracle, you’ll need to add the public key to the authorized_keys file. This will allow Stitch to conntect to the server using a trusted user.
-
Open a new terminal window and log into your SSH server.
-
Create a group named
stitch:sudo groupadd stitch -
Create a user named
stitch:sudo useradd -m -g stitch stitch -
Switch to the
stitchuser:sudo su - stitch -
Create the
.sshdirectory:mkdir ~/.ssh -
Using
chmod, alter the permissions of the directory to allow access:chmod 700 ~/.ssh -
Navigate to the
.sshdirectory:cd ~/.ssh -
Using
touch, create theauthorized_keysfile:touch authorized_keys -
Set the permissions for
authorized_keys:chmod 600 authorized_keys -
Import the Stitch public key into
authorized_keys, replacing<PUBLIC KEY>with the public key. Verify after replacing the key that it is on one line and doesn’t contain line breaks:echo "<PUBLIC KEY>" >> ~/.ssh/authorized_keys
If you skip this step or the Public Key is added incorrectly, the following error will surface when you save the integration in Stitch:
"Message from SFTP server: Authentication failed. - Please ensure that the server is configured to accept the public key for this integration."
Step 2: Verify Responsys Connect data export configuration
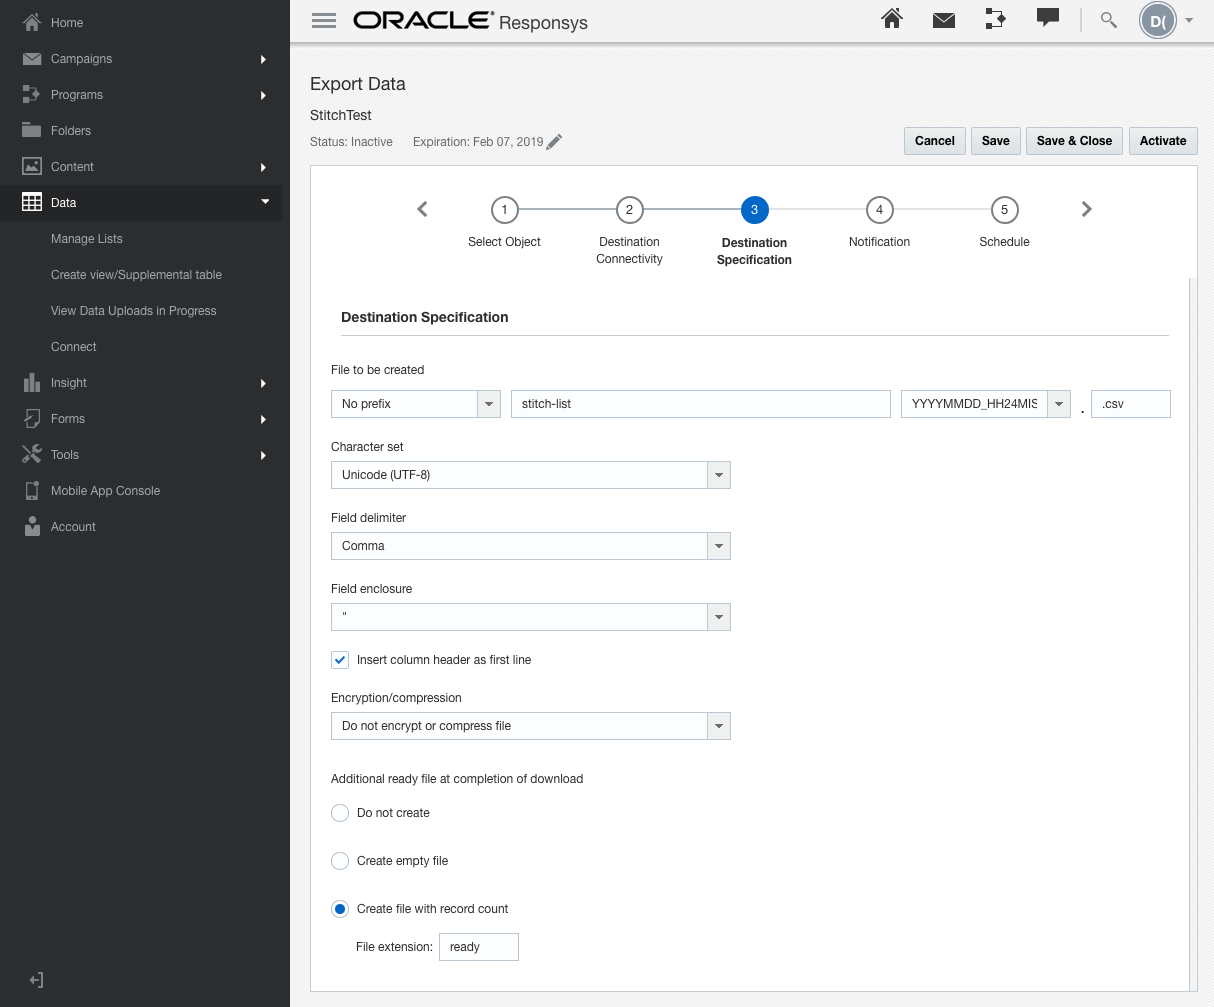
Stitch’s Responsys integration replicates .csv or .txt files created as part of a Connect data export job. In the Responsys app, jobs are created and managed in the Manage Connect page, accessed via Data > Connect.
File settings are defined in the Destination Specification step of the Connect data export process, which can be seen in the image to the right.
The settings in the Destination Specification page must match the required values listed in the table below. This will ensure that data is replicated successfully from Responsys.
| Setting in Responsys | Required value |
| File to be created |
We recommend using a date/time prefix OR suffix for file names, which will result in Responsys creating multiple files. If a prefix or suffix isn’t used, the export will only ever create a single file. Every new export will replace the entire file, overwriting the data it contains. If this occurs before Stitch runs an extraction job, the overwritten data would be lost and unable to be replicated. |
| File extension |
.csv or .txt Stitch’s Responsys integration doesn’t currently support replicating other file types. |
| Character set |
Unicode (UTF-8) |
| File delimiter |
Comma Stitch’s Responsys integration doesn’t currently support other file delimiters. |
| Field enclosure |
Double quotes ( |
| Insert column header as first line |
Box must be checked Stitch’s Responsys integration requires that the first row of every export file be a column header. |
| Encryption/compression |
Do not encrypt or compress file Stitch’s Responsys does not currently support replicating encrypted or compressed files. |
| Additional ready file at completion of download |
Select Create file with record count. In the File extension field, enter |
Step 3: Connect Stitch
In this step, you’ll complete the setup by entering the connection details and defining replication settings in Stitch:
Step 3.1: Define the Responsys connection details
The info you need to complete the remaining fields depends on how your SFTP server is hosted:
If your server is hosted by Oracle, you can find its connection details in the Responsys app by navigating to Data > Connect > Destination Connectivity. If you have multiple file locations, click the one you want to connect to Stitch.
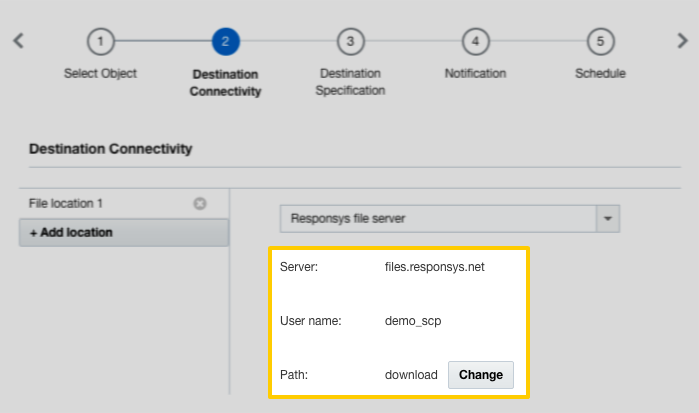
The image on the right shows an example of the connection details in Responsys.
Fill in the remaining fields in Stitch as follows:
- Host: In Stitch, enter the value from the Responsys Server field. This will likely be
files.responsys.net - Port: Leave this as
22. - Username: In Stitch, enter the value from the Responsys User name field. In the example, this is
demo_scp - Path: In Stitch, enter the value of the Responsys Directory path field, or the file server path where completed Responsys export files are stored. In the example, this is
download
If your server is hosted by Oracle, you can find its connection details in the Responsys app by navigating to Data > Connect > Destination Connectivity. If you have multiple file locations, click the one you want to connect to Stitch.
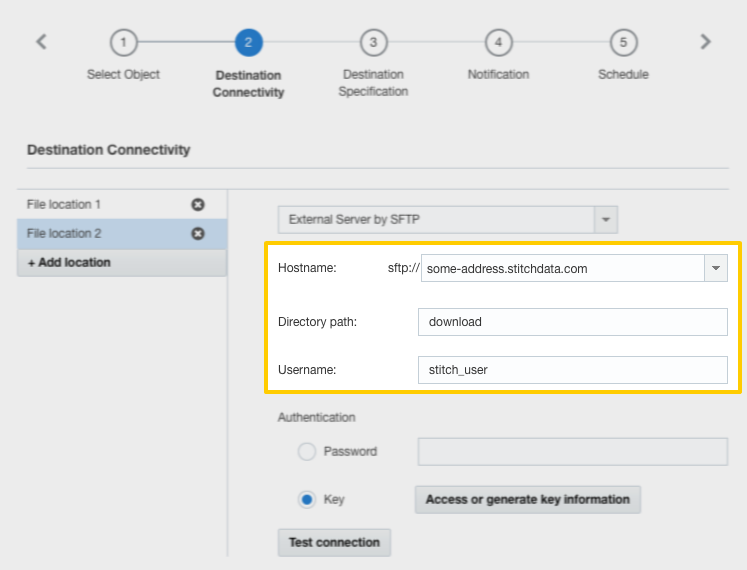
The image on the right shows an example of the connection details in Responsys.
Fill in the remaining fields in Stitch as follows:
- Host: Enter the host address (endpoint) used by the SFTP server.
- Port: Enter the SSH port used by the SFTP server. This is usually
22. - Username: Enter the name of the user you created in Step 1.2. In the example, this is
stitch_user - Path: Enter the file server path where completed Responsys export files are stored.
Step 3.2: Define the historical sync
The Sync Historical Data setting defines the starting date for your Responsys integration. This means that data equal to or newer than this date will be replicated to your data warehouse.
Change this setting if you want to replicate data beyond Responsys’s default setting of 1 year. For a detailed look at historical replication jobs, check out the Syncing Historical SaaS Data guide.
Step 3.3: Create a replication schedule
In the Replication Frequency section, you’ll create the integration’s replication schedule. An integration’s replication schedule determines how often Stitch runs a replication job, and the time that job begins.
Responsys integrations support the following replication scheduling methods:
-
Advanced Scheduling using Cron (Advanced or Premium plans only)
To keep your row usage low, consider setting the integration to replicate less frequently. See the Understanding and Reducing Your Row Usage guide for tips on reducing your usage.
Step 4: Select data to replicate
The last step is to select the tables you want to replicate.
Note: If a replication job is currently in progress, new selections won’t be used until the next job starts.
For Responsys integrations, you can select:
-
**Individual tables **
-
All tables and columns
Click the tabs to view instructions for each selection method.
- In the Integration Details page, click the Tables to Replicate tab.
- Locate a table you want to replicate.
- Click the checkbox next to the table’s name. A blue checkmark means the table is set to replicate.
- After you set a table to replicate, a page with the table’s columns will display. De-select columns if needed. Note: Responsys tables replicate using Key-based Incremental Replication. Refer to the Replication section for more info.
-
Repeat this process for every table you want to replicate.
- Click the Finalize Your Selections button at the bottom of the page to save your data selections.
- Click into the integration from the Stitch Dashboard page.
-
Click the Tables to Replicate tab.
-
Navigate to the table level, selecting any databases and/or schemas that contain tables you want to replicate.
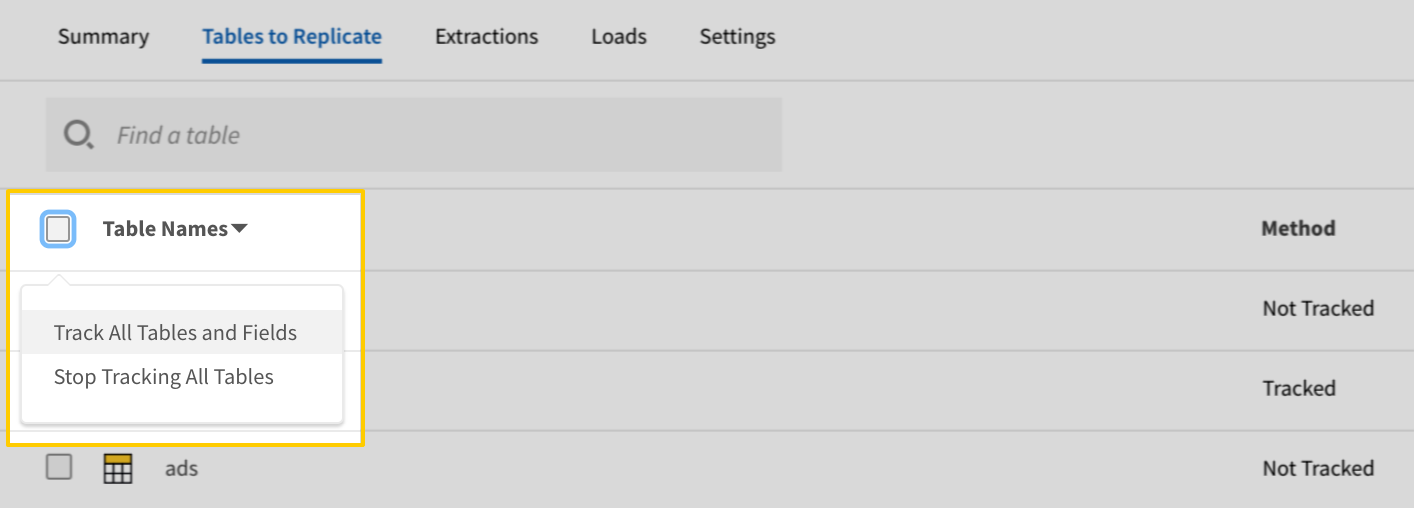
- In the list of tables, click the box next to the Table Names column.
-
In the menu that displays, click Track AllTables and Fields (Except Views):
- Click the Finalize Your Selections button at the bottom of the page to save your data selections.
Initial and historical replication jobs
After you finish setting up Responsys, its Sync Status may show as Pending on either the Stitch Dashboard or in the Integration Details page.
For a new integration, a Pending status indicates that Stitch is in the process of scheduling the initial replication job for the integration. This may take some time to complete.
Initial replication jobs with Anchor Scheduling
If using Anchor Scheduling, an initial replication job may not kick off immediately. This depends on the selected Replication Frequency and Anchor Time. Refer to the Anchor Scheduling documentation for more information.
Free historical data loads
The first seven days of replication, beginning when data is first replicated, are free. Rows replicated from the new integration during this time won’t count towards your quota. Stitch offers this as a way of testing new integrations, measuring usage, and ensuring historical data volumes don’t quickly consume your quota.
Responsys replication
While data from Responsys integrations is replicated using Key-based Incremental Replication, the behavior for this integration differs subtly from other integrations.
The table below compares Key-based Incremental Replication and Replication Key behavior for Responsys to that of other integrations.
| Responsys | Other integrations | |
| What's replicated during a replication job? |
The entire contents of a modified file. |
Only new or updated rows in a table. |
| What's used as a Replication Key? |
The time a file is modified. |
A column or columns in a table. |
| Are Replication Keys inclusive? |
No. Only files with a modification timestamp value greater than the last saved bookmark are replicated. |
Yes. Rows with a Replication Key value greater than or equal to the last saved bookmark are replicated. |
Responsys Schema
Responsys tables will contain the same columns that the source files contains. These tables will also contain common system columns, as well as columns specific to Responsys integrations:
| _sdc_source_file |
Applicable only to Intacct and Responsys integrations, this column contains the file path on the SFTP server of the table’s source file. |
| _sdc_source_lineno |
Applicable only to Intacct and Responsys integrations, this column contains the row number for the record in the source file. |
| Related | Troubleshooting |
Questions? Feedback?
Did this article help? If you have questions or feedback, feel free to submit a pull request with your suggestions, open an issue on GitHub, or reach out to us.