This integration is certified by Stitch. For support, contact Support.
Doorbell.io integration summary
Stitch’s Doorbell.io integration uses the Stitch Import API to send data from Doorbell.io to Stitch.
Doorbell.io feature snapshot
A high-level look at Stitch's Doorbell.io (v) integration, including release status, useful links, and the features supported in Stitch.
| STITCH | |||
| Release status |
Released |
Supported by | |
| Stitch plan |
Standard |
API availability |
Not available |
| Singer GitHub repository |
Not applicable |
||
| REPLICATION SETTINGS | |||
| Anchor Scheduling |
Unsupported |
Advanced Scheduling |
Unsupported |
| Table-level reset |
Unsupported |
Configurable Replication Methods |
Unsupported |
| DATA SELECTION | |||
| Table selection |
Unsupported |
Column selection |
Unsupported |
| Select all |
Unsupported |
||
| TRANSPARENCY | |||
| Extraction Logs |
Supported |
Loading Reports |
Supported |
Connecting Doorbell.io
Step 1: Locate your Stitch client ID
To locate your client ID, look at the URL in your web browser when you’re logged into Stitch:

Your client ID is the number between client/ and /pipeline. In this example, the client ID is 100608.
Step 2: Add Doorbell.io as a Stitch data source
- Sign into your Stitch account.
-
On the Stitch Dashboard page, click the Add Integration button.
-
Click the Import API icon.
-
Enter a name for the integration. This is the name that will display on the Stitch Dashboard for the integration; it’ll also be used to create the schema in your destination.
For example, the name “Stitch Doorbell.io” would create a schema called
stitch_doorbellioin the destination. Note: Schema names cannot be changed after you save the integration. - Click Save and Generate Token.
After you save the integration, Stitch will generate and display an API token. This will be used in the next step to authenticate with Doorbell.io.
Note: Stitch will only display this token once, so be sure to copy it before closing the page. Otherwise, you’ll need to generate a new token.
Step 3: Add your API token to Doorbell.io

- Sign into your Doorbell.io account.
- Click the application you want to connect to Stitch.
- On the application’s homepage, click the Setup (gear) icon near the top-right corner of the page.
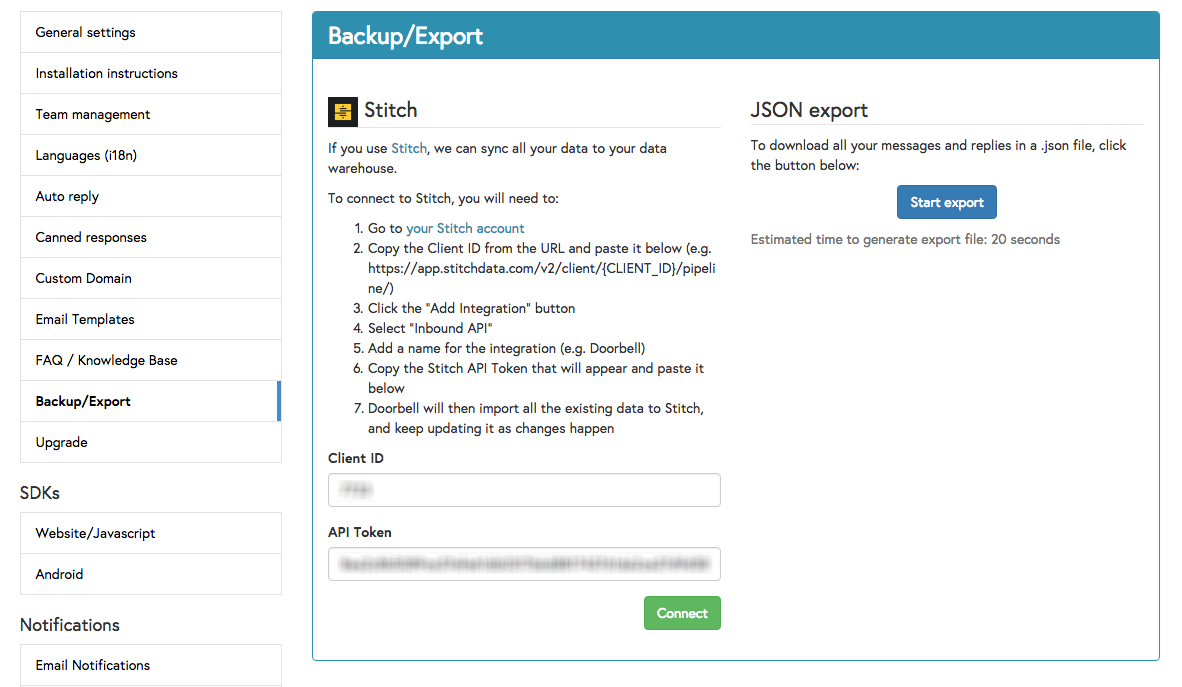
- On the Setup page, click the Backup/Export option from the menu on the left.
- In the Client ID field, enter your Stitch client ID.
- In the API Token field, paste the API token you generated in Step 2.
- Click Connect.
| Related | Troubleshooting |
Questions? Feedback?
Did this article help? If you have questions or feedback, feel free to submit a pull request with your suggestions, open an issue on GitHub, or reach out to us.